 RSyntaxTree
Documentation
Table of Contents
- Basic Usage
- The Notation at a Glance
- Tree Direction
- Tidy Layout
- Mirrored Layout for RTL Scripts
- Fonts
- Drawing Text
- Whitespace and Line Breaks
- Drawing Non-Text Elements
- Connectors
- Brackets and Rectangles around a Leaf
- Per-Node Styling (Color)
- Shear
- Region Shade
- Escape Special Characters
- Feature Structures
- Derivations
- Draw Paths between Nodes
- Draw Extra Connectors between Nodes
- Penn Treebank Format
- Running RSyntaxTree Yourself (advanced)
Basic Usage
Type your text in the editor area using labeled bracket notation and click the Draw PNG or Draw SVG button.
Every branch or leaf of the syntax tree must belong to a node. To create a node, place the label text right next to the start bracket. Any number of branches may follow, separated by a whitespace. (Node labels containing whitespaces can be created using the <> symbol. For example, Modal<>Aux will be rendered as Modal Aux).
The Connector shape option (leafstyle, CLI --leafstyle) chooses what is drawn between a node and its leaves; the three settings are described under Connectors. Whichever is chosen, the connectors can be made transparent with the Hide connectors option.
The newline character \n can be used within the text of both node labels and leaves (a backslash followed by a space or a line break works too).
RSyntaxTree can generate PNG and SVG, SVG can be used with third party vector graphics software such as Adobe Illustrator, Microsoft Visio, BOXY SVG, etc. It is very useful if you want to modify the output image.
The options Font, Size, V spacing, and Color need no explanation. By changing the values of these options, you can change the appearance of the resulting image.
Color offers Modern and Traditional, which colour node and leaf labels, None, which draws everything in black, and Gray lines, which keeps the labels black but draws the connectors and movement paths in grey.
Line width sets the thickness of every line in the figure — connectors, brackets, enclosures — as a ratio of the font size. 1 is 5% of it (the weight of an ordinary text rule), each 0.5 step adds another 2.5%, and the scale runs from 0.5 (a hairline) to 3.0 (15%, the heaviest). Because the lines follow the font size, text and lines keep the same balance at any font size.
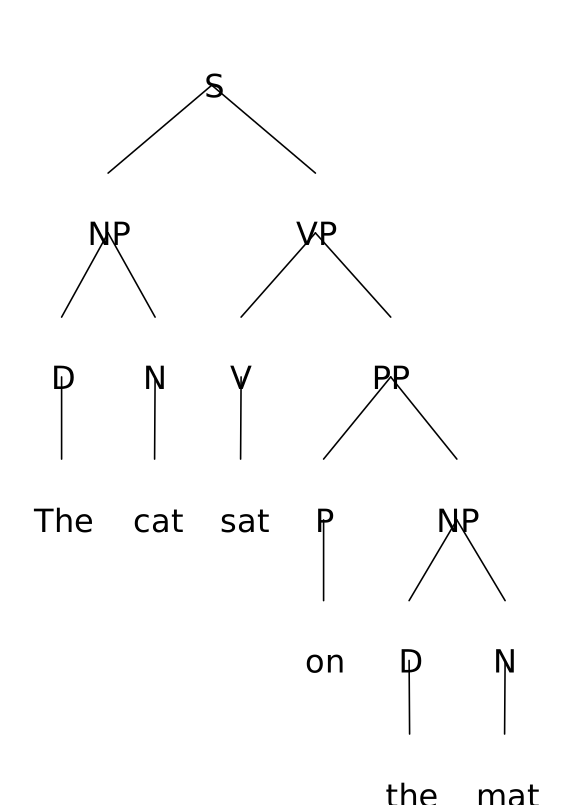
[S
  [NP
    [D The]
    [N cat]
  ]
  [VP
    [V sat]
    [PP
      [P on]
      [NP
        [D the]
        [N mat]
      ]
    ]
  ]
]
The Notation at a Glance
Everything the notation can draw, one line each, with the section that explains it. Every sample here is drawn by a test, so each one works.
Structure
[S [NP the cat] [VP sat]]— a node and its children → Basic Usage(S (NP the cat) (VP sat))— Penn Treebank input, converted on sight → Penn Treebank Format^cats— force a triangle over one leaf (a spaced leaf gets one by itself) → Connectors<>as a whole label — an invisible joint, to level the terminals → Levelling the Terminals+1on two nodes,+>1for an arrowhead — a movement path → Paths+-1,+->1— an extra straight connector → Extra Connectors
Inside a label
*x*,**x**,***x***— italic, bold, both → Drawing Textx_i_,x__2__— subscript, superscript → Subscript and SuperscriptH___EAD___— small capitals → Small Capitals=x=,-x-,~x~— overline, underline, strikethrough → Text Decoration\n(or a backslash at the line’s end) — a line break; twice for a blank line → Newline\t— columns, aligned down the label → Columns---on a line of its own — a rule across the label;===a double rule → Horizontal Line|1|,{2}— boxed and circled text (more than one character draws a capsule) → Box, Circle, Bar, and Arrow||,{},|/|,{/}— empty and hatched boxes and circles → Box, Circle, Bar, and Arrow--,->,<-,<->— a bar and arrows as symbols; bold inside*...*, as in*->*→ Box, Circle, Bar, and Arrow
Around a label
#NP,##NP,###NP— square brackets, a rectangle, a bold rectangle → Brackets and Rectangles#(HEAD\tnoun#)— a feature matrix as a value, nested to any depth → Nested matrices[#(CAT\tS#) ...]— a whole label that is one matrix → Feature Structures%NP,%@blue:NP— a region shade behind the whole subtree → Region Shade@red:NP,@#3af:NP— colour, by name or 3/6 hex digits → Per-Node Styling
Options — each is a select in the web interface and a flag on the command line.
format— png, svg, pdf, …fontstyleandfontsize— the typeface and its size → Fontscolor— colour the nodes and leaves, or draw in blacklinewidth— the weight of every line, as a ratio of the font sizeleafstyle— what joins a node to its leaf → Connectorsdirection— ttb, ltr, or btt → Tree Directionmirror— flip the finished tree for RTL scripts → Mirrored Layouttidy,hspacingandvheight— the packing and the spacing → Tidy Layoutpolyline— right-angled connectors → Connectorshide_default_connectors— for figures whose links are all drawn by hand → Connectorstransparent— a clear backgroundderivation— derivation figures → Derivationshyphen— whether a hyphen is markup or a character → Hyphensshearandshear_plane— tilt the finished figure so it lies on a tilted plane → Shearvmargin— the clearance between a label and its connectors, the same above as below
Tree Direction
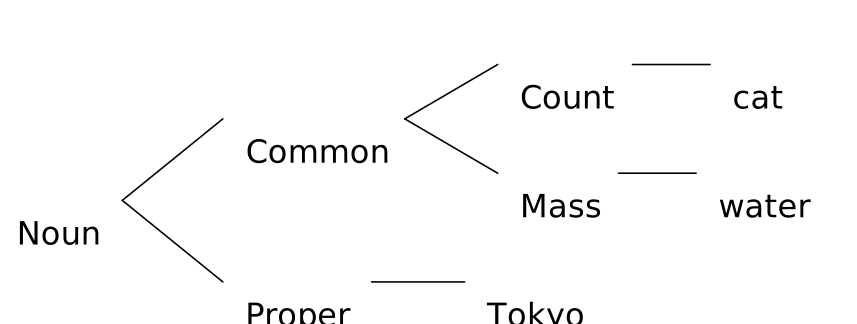
The Direction option controls the orientation of the tree layout:
- Top to Bottom (
ttb): The default. Root node at the top, leaves at the bottom. - Left to Right (
ltr): Root node at the left, leaves expand to the right. Useful for classification trees, taxonomies, and other hierarchical structures where horizontal layout is preferred. - Bottom to Top (
btt): Leaves at the top, root at the bottom. This is how a derivation is written, with the words first and the result last: see Derivations.
In left-to-right mode, connectors, triangles, movement paths, and line-type connections are all adapted to the horizontal orientation. The V spacing option controls the horizontal depth between tree levels in LTR mode.
[Noun
  [Common
    [Count *cat*]
    [Mass *water*]
  ]
  [Proper *Tokyo*]
]
Tidy Layout
The Tidy layout option (tidy, CLI --tidy) selects the layout mode, on one scale from the most spacious to the most dense:
- Symmetric (
symmetric): radical symmetrization — every subtree is centered in a uniform slot, giving a wide, fully balanced figure. Linguistic trees do not normally call for it. - Off (
off): the plainest layout. If it looks unbalanced, try one of the tidy modes. - Low (
low): adjacent subtrees are pulled toward each other wherever their outlines leave unused space. Every leaf keeps its strict left-to-right position, so word order is preserved across the whole figure. - Medium (
medium): compresses further by letting a shallow subtree tuck into the empty space above the deep tail of its neighbor (e.g. a specifier NP moving toward the head). Two leaves never swap their left-right order. - High (
high): the densest mode, tucking without limit and allowing branch angles to differ sharply between levels if that buys width. Leaf order is guaranteed only among leaves on the same row, so the linear order of the sentence may be broken locally along the horizontal axis of the figure.
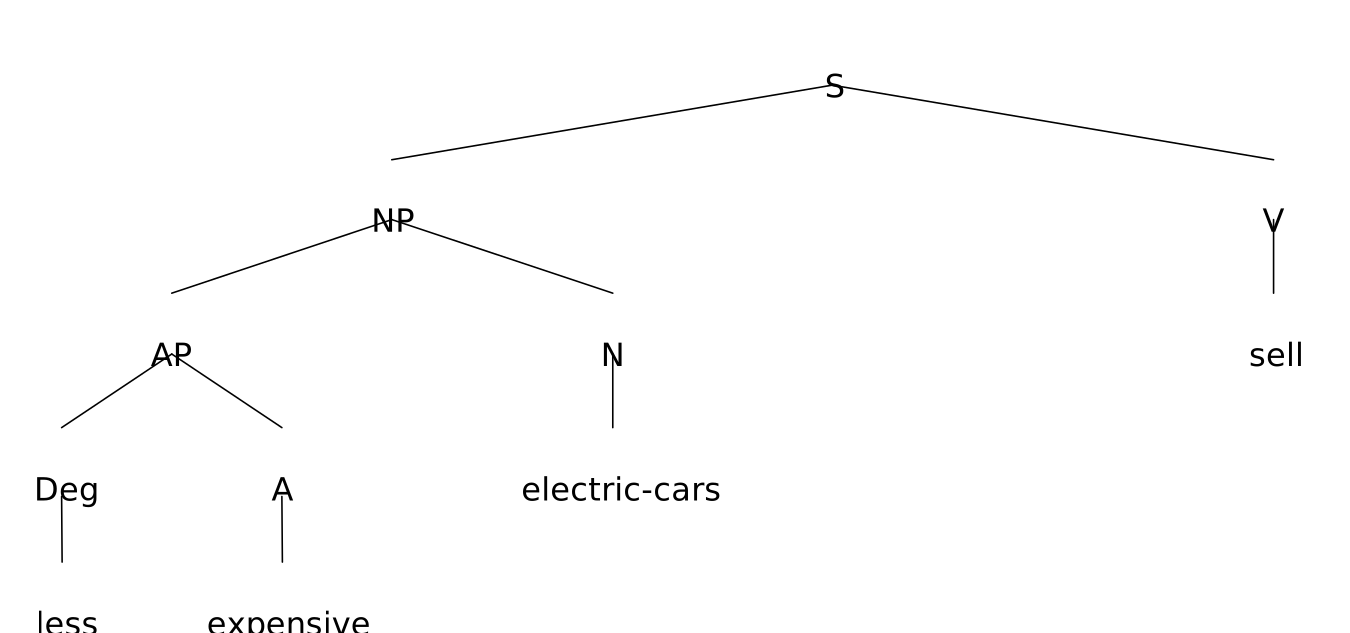
One tree at each of the five settings, narrowing at every step. The last two are set side by
side, where the difference is smallest: high pulls sell in against the
noun, and medium leaves it where the branch puts it.
[S
  [NP
    [AP
      [Deg less]
      [A expensive]
    ]
    [N electric\-cars]
  ]
  [V sell]
]
 Symmetric
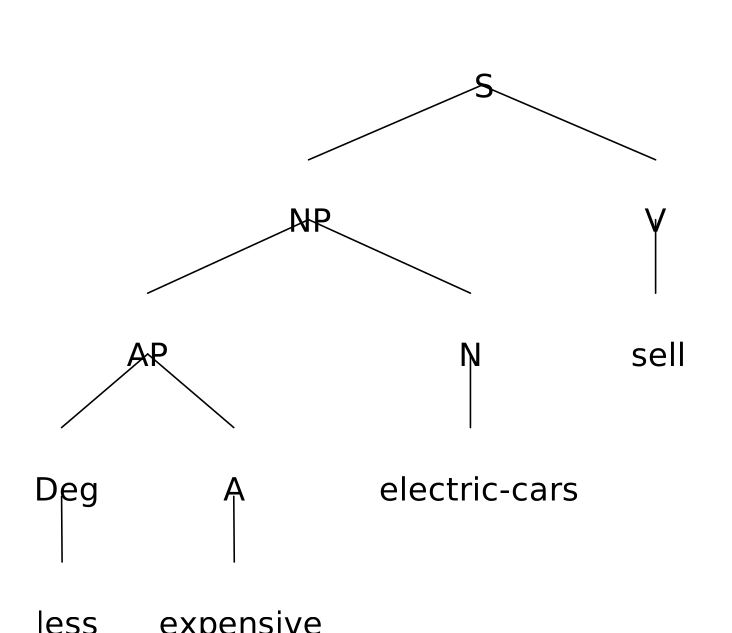 Off
Off
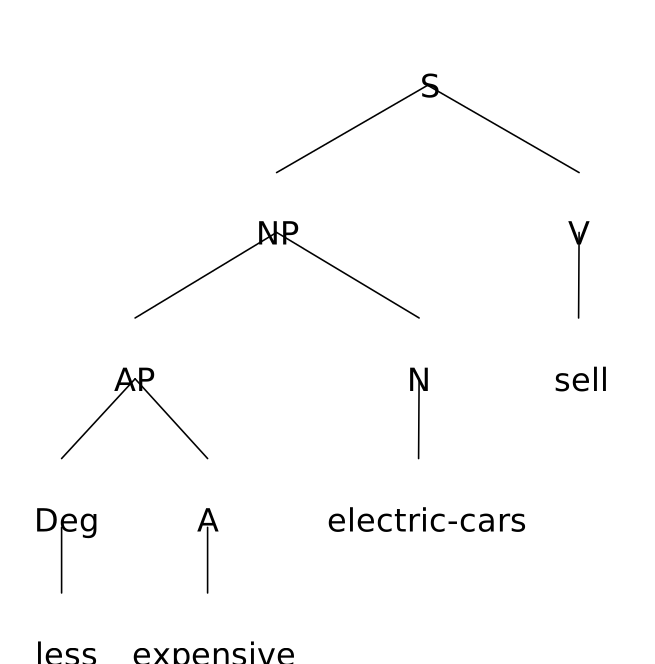 Low
Low
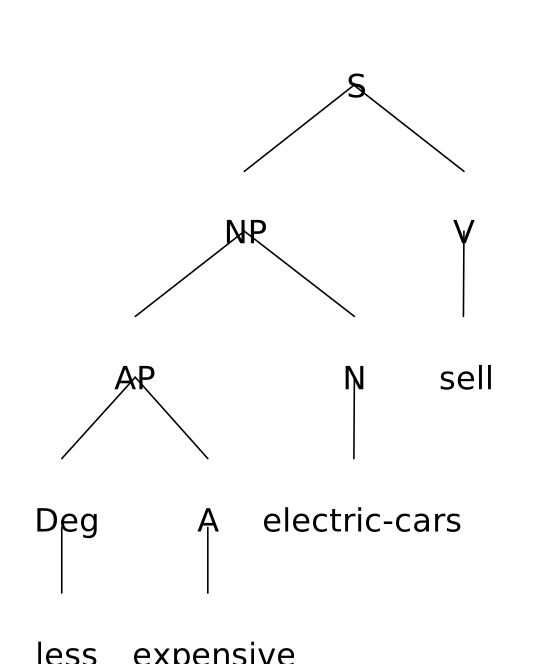 Medium
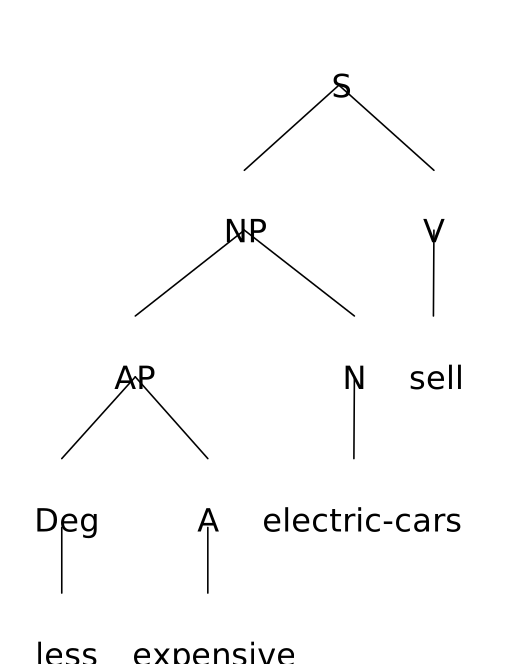 High
High
high pays off on deeply lopsided trees; on a well-balanced one it often lands close to medium. off, low and medium cover ordinary work.
Connector heights adjust automatically in tidy mode. H spacing (hspacing, default 1.0, range 0.5–3.0) and V spacing (vheight) scale the horizontal and vertical gaps, and both apply in every layout mode, tidy or not.
Mirrored Layout for RTL Scripts
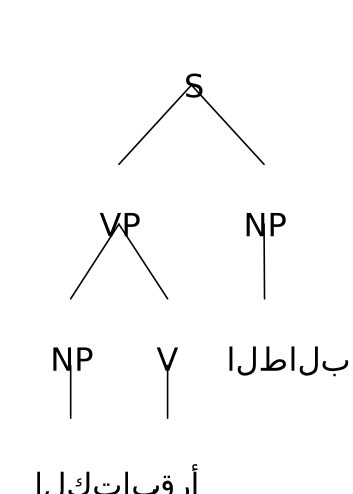
Trees for right-to-left scripts such as Arabic and Hebrew can be drawn expanding from right to left. The Mirror (RTL) option (mirror: on, CLI --mirror) reflects the entire finished layout horizontally: the structure is unchanged, but the leaf order is reversed so the sentence reads in its natural direction.
Mirror composes with Direction.
[S
  [NP الطالب]
  [VP
    [V قرأ]
    [NP الكتاب]
  ]
]
Fonts
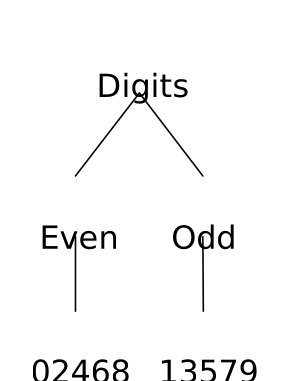
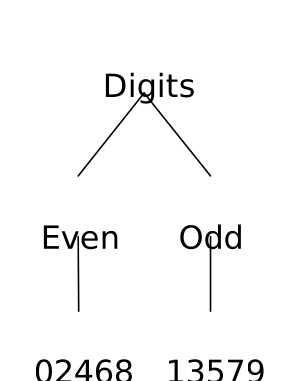
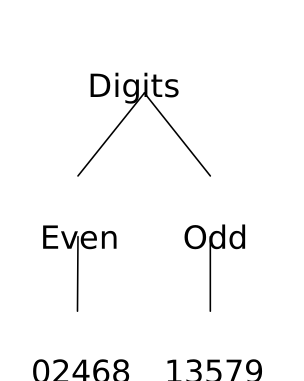
A figure is drawn with one of three faces, chosen with Font:
Noto Sans(sans): latin and other basic Unicode characters in a sans serif face.Noto Serif(serif): the same range in a serif face.Noto Sans Mono(mono): the same range in a mono-spaced face.
All three fall back to Noto CJK for Han, Hangul and kana, so any of them renders CJK text.
The same tree in each of the three:
[Digits
  [Even 02468]
  [Odd 13579]
]
 Sans
Sans
 Serif
Serif
 Mono
Mono
Which fonts have to be on which machine depends on the format. A PNG or a PDF is drawn here and arrives as a picture, so nothing needs installing to look at one. An SVG carries the names of the faces rather than the shapes, and whatever opens it supplies them — so a machine without these fonts substitutes what it has, and the text comes out a little out of balance:
- Noto Sans: for latin and other basic Unicode characters in sans serif
- Noto Sans JP: for Japanese characters in sans serif
- Noto Serif: for latin and other basic Unicode characters in serif
- Noto Serif JP: for Japanese characters in serif
- Noto Sans CJK / Noto Serif CJK: for the full CJK range, including Hangul and simplified Han (the JP families above cover Japanese only)
- Noto Sans Mono: for latin and other basic Unicode characters in sans serif mono (semi-condensed)
- Noto Emoji: for emoji characters (the monochrome build; colour emoji fonts are not rendered by the PNG/PDF pipeline)
Drawing Text
You can apply font styles (italic/bold/bold-italic), text decoration (overline/underline/line-through), subscript/superscript font rendering, and more. These markups can be nested within each other.
[Styles
  [Emphasis *italic* **bold**]
  [Lines =overline= -underline- ~struck~]
  [Scripts X_i_ Y__j__]
]
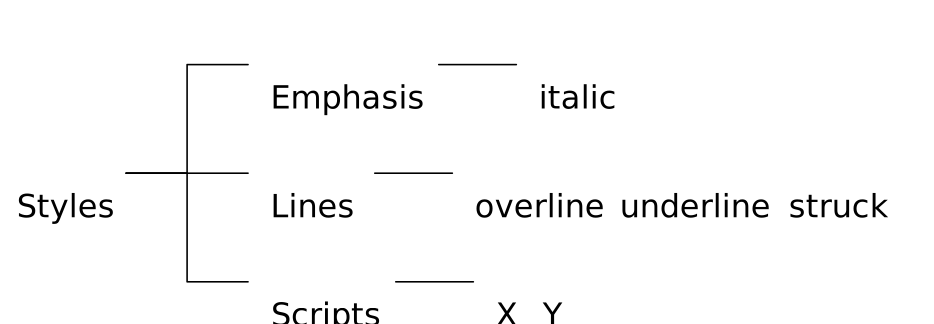
Font Styles
| Style | Symbol | Sample Input | Output |
|---|---|---|---|
| Italic | *TEXT* |
*italic* |
italic |
| Bold | **TEXT** |
**bold** |
bold |
| Italic+bold | ***TEXT*** |
***italic bold*** |
italic bold |
Text Decoration
| Decoration | Symbol | Sample Input | Output |
|---|---|---|---|
| Overline | =TEXT= |
=overline= |
overline |
| Underline | -TEXT- |
-underline- |
underline |
| Line-through | ~TEXT~ |
~linethrough~ |
linethrough |
Subscript and Superscript
| Sample Input | Output |
|---|---|
normal_subscript_ |
normalsubscript |
normal__superscript__ |
normalsuperscript |
Whitespace and Line Breaks
Whitespace inside a Label
| Sample Input | Output |
|---|---|
X<>Y |
X Y |
A label that is only <> is a special case with its own use: see Levelling the Terminals below.
Levelling the Terminals
A node whose label is only <> renders as an invisible pass-through joint: the connector runs continuously through it without a break. Chaining such nodes pushes a shallow leaf down so it aligns with deeper leaves — useful when every terminal should sit on the same row.
[S
  [NP
    [D
      [<>
        [<> the]
      ]
    ]
    [N
      [<>
        [<> cat]
      ]
    ]
  ]
  [VP
    [V
      [<>
        [<> sat]
      ]
    ]
    [PP
      [P
        [<> on]
      ]
      [NP
        [D the]
        [N mat]
      ]
    ]
  ]
]
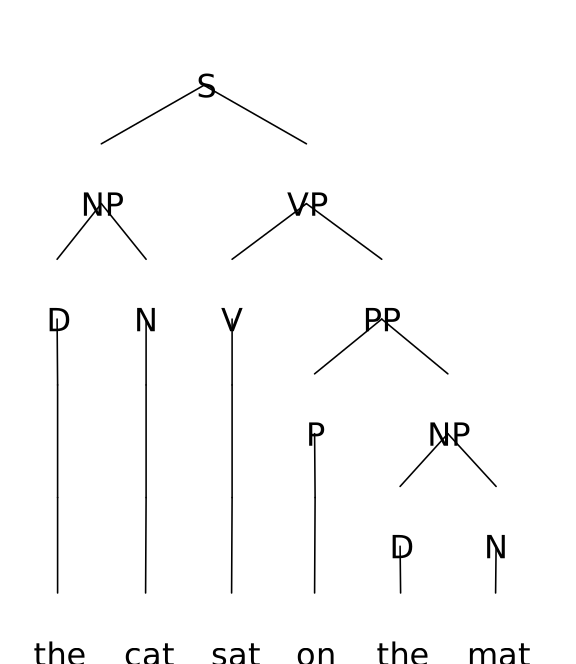
Without the joints, the, cat and sat sit two rows above the and mat, and on one row above. Each leaf takes as many joints as it needs to reach the deepest row, so all six words end up on the bottom row. The Animal ontology example in the gallery uses <>-only joints the same way.
Newline
A label is broken onto a new line three ways, and they mean the same thing: a
backslash at the end of the line, a backslash followed by a space, or \n. Two
of them in a row leave a blank line. The backslash is the escape character, so a
literal one is written \\ — see Escape Special Characters.
| Sample Input | Output |
|---|---|
str1\str2 |
str1 str2 |
str1\ \str2 |
str1 str2 |
str1\ str2 |
str1 str2 |
str1\ \ str2 |
str1 str2 |
str1\nstr2 |
str1 str2 |
str1\n\nstr2 |
str1 str2 |
Drawing Non-Text Elements
Circles, boxes and rules can be drawn around or alongside the text. Any character the fonts carry can stand in a label as well, emoji included — drawn from the monochrome Noto Emoji, so they come out as outlines rather than in colour.
[Shapes
  [#Brackets |1| {2}]
  [##Rectangle {capsuled}]
  [Emoji 🌱 🐛 ✅]
]
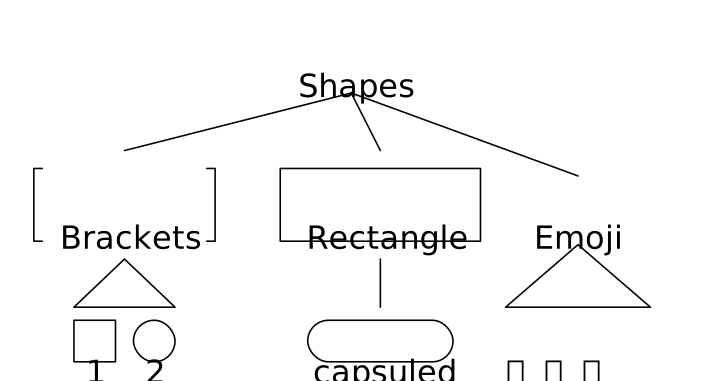
Small Capitals
Attribute names in a feature structure are conventionally set in small caps, and the look can be imitated without a small-caps font. Leave the capital as it is and wrap the rest in ___: H___EAD___ draws a full-size H followed by a smaller EAD.
[#H___EAD___\tnoun\
  C___ASE___\tnom
  Kim
]
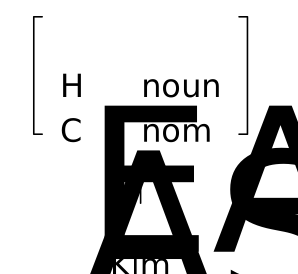
Box, Circle, Bar, and Arrow
| Sample Input | Output |
|---|---|
|| |
 |
{} |
 |
*||* |
 |
*{}* |
 |
|/| |
 |
{/} |
 |
|1| |
 |
{1} |
 |
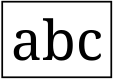
|abc| |
 |
{abc} |
 |
-- |
 |
*--* |
 |
-> |
 |
*->* |
 |
<- |
 |
*<-* |
 |
<-> |
 |
*<->* |
 |
Horizontal Line
| Sample Input | Output |
|---|---|
str1\---\str2 |
str1 —— str2 |
str1\ ---\ str2 |
str1 —— str2 |
str1\n---\nstr2 |
str1 —— str2 |
Here, --- represents - repeated three times or more consecutively.
Connectors
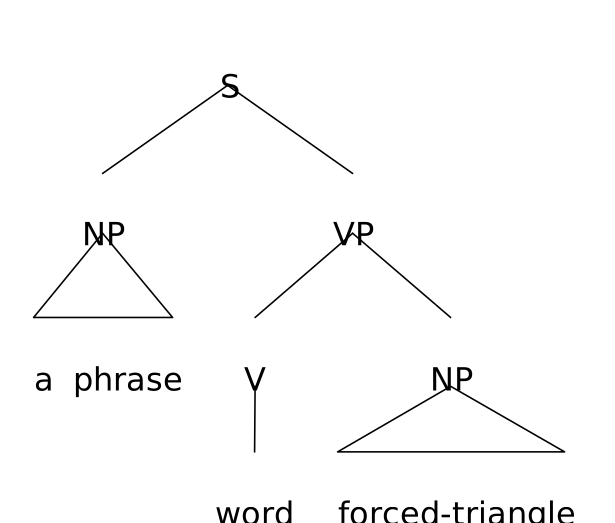
Connector shape offers three settings for what is drawn between a node and its leaves (auto, bar and none). auto draws a triangle for leaves containing one or more whitespaces (= phrases). If the leaf does not contain any spaces (= single word), a straight bar is drawn instead. A ^ at the beginning of a leaf declares it to be a phrase, so a triangle is always drawn for it. It can go at the head of the node’s label instead: [NP ^cats] and [^NP cats] ask for the same thing. bar draws a straight bar for every leaf. none draws no connector between a node and its leaves.
[S
  [NP a phrase]
  [VP
    [V word]
    [NP ^forced\-triangle]
  ]
]
Brackets and Rectangles around a Leaf
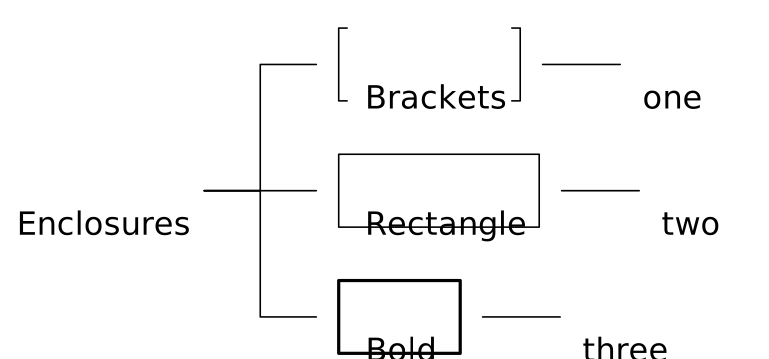
In auto mode, the triangle connector shape is applied when the terminal node contains words separated by whitespace. bar and none do not read whitespace that way, and under either — as under auto — a ^ at the beginning of the leaf text asks for a triangle, like [NP ^syntax-trees].
If a # character is placed at the beginning of a label or leaf text (right after ^ if there is one), the text is enclosed in a pair of square brackets (e.g. [#NP text], [NP #text], [NP ^#text]).
If ## is placed at the beginning of the leaf text, a rectangle is drawn instead of brackets.
If ### is placed at the beginning of the leaf text, a rectangle with thicker lines is drawn.
[Enclosures
  [#Brackets one]
  [##Rectangle two]
  [###Bold three]
]
Per-Node Styling (Color)
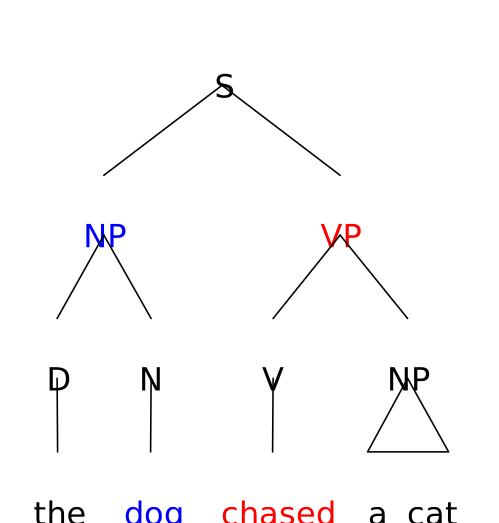
You can specify a custom color for individual nodes using the @color: prefix. Both named colors and hex color codes are supported.
| Sample Input | Description |
|---|---|
@red:NP |
Named color (red) |
@blue:VP |
Named color (blue) |
@#FF5500:NP |
Hex color code |
@#0A0:VP |
Short hex color code |
Markup Order: When combining with other prefixes, use this order: ^ (triangle) → # (enclosure) → % (region shade) → @color: (color)
| Sample Input | Description |
|---|---|
^@blue:NP |
Triangle connector + blue color |
#@red:NP |
Square brackets + red color |
^#@green:NP |
Triangle + brackets + green color |
[S
  [@blue:NP
    [D the]
    [N @blue:dog]
  ]
  [@red:VP
    [V @red:chased]
    [NP a cat]
  ]
]
Shear
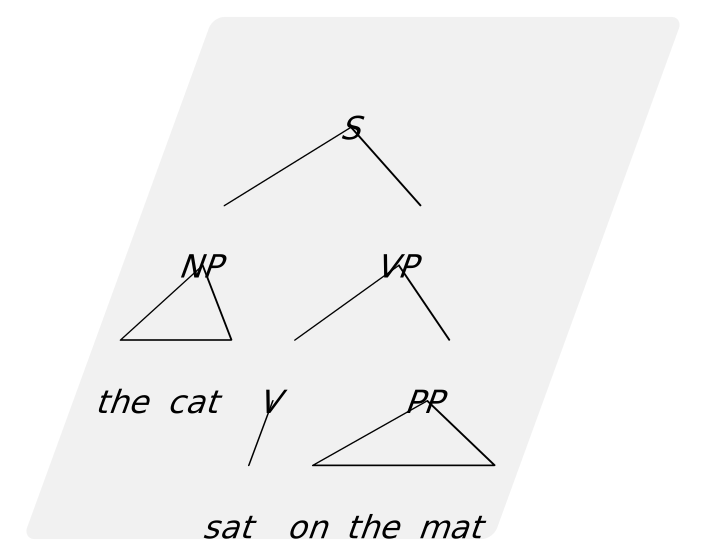
Shear tilts the finished figure by so many degrees — positive leans the top
to the right — and Shear plane draws the plane it lies on. Turn the plane
off, or give it a colour, as the figure needs. A transparent background is
drawn without the plane.
The whole picture leans as one piece: a region shade inside it comes out a parallelogram, and nothing that stood clear of anything else comes to touch it. A sheared figure is drawn as PNG, SVG or PDF; TikZ says so rather than quietly drawing it straight.
A tilted figure is usually worth a tighter V spacing than an upright one:
the lean spreads the tree sideways, and the levels can afford to sit closer.
[S
  [NP the cat]
  [VP
    [V sat]
    [PP on the mat]
  ]
]
Region Shade
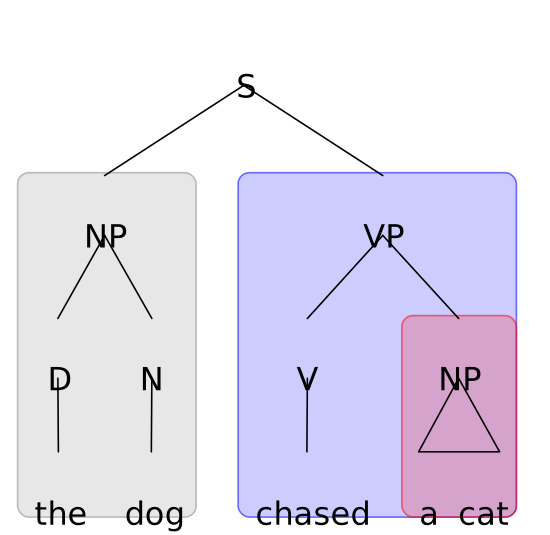
While #, ##, and ### enclose a single node label, a region shade paints a
semi-transparent plane behind the whole subtree that a node governs. This is
useful for marking spans such as c-command domains, binding domains, or the
dominion of a reference point in cognitive grammar.
Put a % at the beginning of a node label (after ^/# if present). The plane
covers the bounding box of that node together with all of its descendants and is
drawn behind the tree lines and labels. The shade color reuses the same
@color: syntax; % on its own uses a light gray.
| Sample Input | Description |
|---|---|
%VP |
Region shade in the default light gray |
%@yellow:VP |
Region shade in yellow (named color) |
%@#ffcc00:VP |
Region shade with a hex color |
%@yellow:@blue:VP |
Yellow shade plane and blue node label (the two colors are independent) |
Each plane is drawn with a border in a darker shade of its own fill color, so
the region stays clearly bounded even on a white background. An explicit shade
color is always honored (just like the @color: node-text color), so for a
black-and-white figure use bare % (gray) rather than a colored shade.
Overlapping or nested regions blend naturally because the planes are
semi-transparent. Region shade works in both top-to-bottom and left-to-right
(-d ltr) layouts, and comes out in every format, TikZ included.
[S
  [%NP
    [D the]
    [N dog]
  ]
  [%@blue:VP
    [V chased]
    [%@red:NP a cat]
  ]
]
Escape Special Characters
The backslash character \ must be used to print certain characters used in the markup. If you do not have the \ key on your keyboard, you can also use the yen/yuan character ¥ to escape.
| Input | Appearance |
|---|---|
\[ | [ |
\] | ] |
\< | < |
\> | > |
\^ | ^ |
\+ | + |
\* | * |
\- | - |
\_ | _ |
\= | = |
\~ | ~ |
\| | | |
\% | % |
\@ | @ |
\' | ' (kept straight) |
\\ | \ |
\¥ | ¥ |
<> | whitespace |
\n | ↩️ |
\↩️ | ↩️ |
\ + whitespace | ↩️ |
Note: A newline character ↩️ is treated just as a whitespace. Thus 1) \n, 2) \↩️, and 3) \ followed by a whitespace character are all rendered as a newline ↩️ in the resulting image. Note also that a ↩️ or a whitespace repeated more than once is reduced to a single whitespace.
Note: A straight ASCII apostrophe (') in a label is automatically rendered as a typographic (curly) apostrophe ’, which suits X-bar primes such as T'. This also applies to apostrophes in ordinary words (e.g. John’s). Write \' for an apostrophe that is to stay straight.
Note: A + followed by digits at the end of a label is a movement path (+1). Written \+, it is a plus sign: C\+\+11 draws C++11.
Feature Structures
An attribute-value matrix is a label of several lines, cut into columns so the attributes line up down one side and their values down the other, with brackets around the whole. It is ordinary label markup, and each piece below is useful by itself.
| To draw | Write | Explained under |
|---|---|---|
| the brackets around the matrix | # at the start of the label |
Brackets and Rectangles around a Leaf |
| attributes and values in columns | \t between them |
Columns |
| a matrix as the value of an attribute | #( … #) |
Nested matrices |
| a boxed tag, for structure sharing | |1| |
Box, Circle, Bar, and Arrow |
| angle brackets around a list | ⟨ and ⟩, typed as themselves |
— |
| a hyphen in a feature name | Hyphen: literal |
Hyphens |
Put together:
[#*word*\
  PHON\t⟨<>*Kim*<>⟩\
  SYNSEM\t#(LOCAL\t#(CAT\t#(HEAD\t#(*noun*\
    CASE\t*nom*#)\
    SPR\t⟨<>|1|<>⟩#)#)#)
]
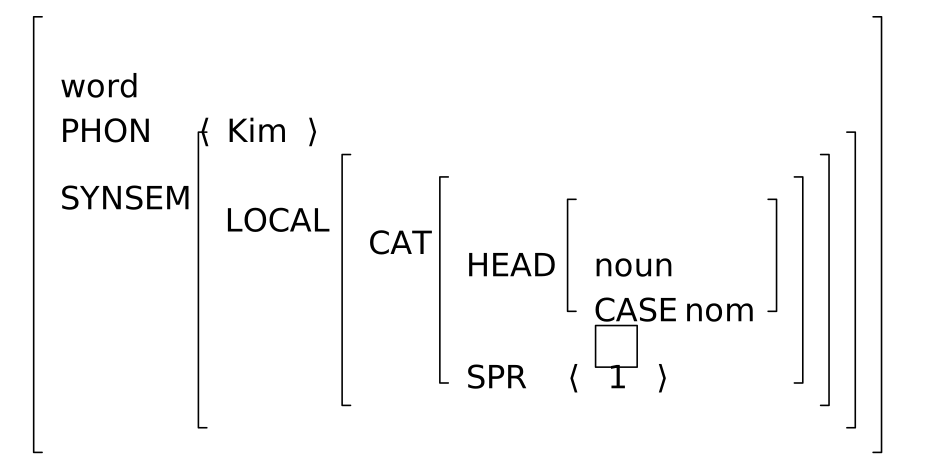
A matrix can also stand at a node of a tree, which is what HPSG does with them, and can be the category of a step in a derivation.
Columns
\t cuts a line into cells. Every line of the label is cut at the same points, and each column is drawn at the width of its widest cell, so the parts line up down the label instead of starting wherever the text before them happened to end. This is what an attribute-value matrix asks for — the attributes in one column, their values in the next:
[#HEAD\tnoun\
  SPR\t⟨<>⟩\
  COMPS\t⟨<>NP<>⟩
  Kim
]
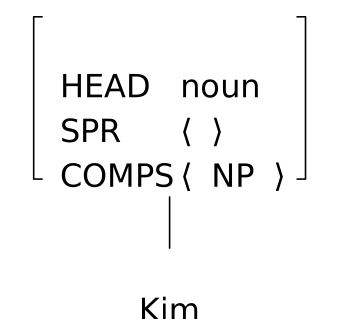
A label with more than two columns works the same way; each is as wide as it needs to be. See the Head-Driven Phrase Structure Grammar example in the gallery.
Nested matrices
The value of an attribute can be another matrix, written between #( and #). It draws its own brackets and lays out its own columns, and the rows that follow it clear its full height:
[#*word*\
  PHON\t⟨<>*Kim*<>⟩\
  SYNSEM\t#(LOCAL\t#(CAT\t#(HEAD\t#(*noun*\
    CASE\t*nom*#)\
    SPR\t⟨<>⟩#)#)#)
]
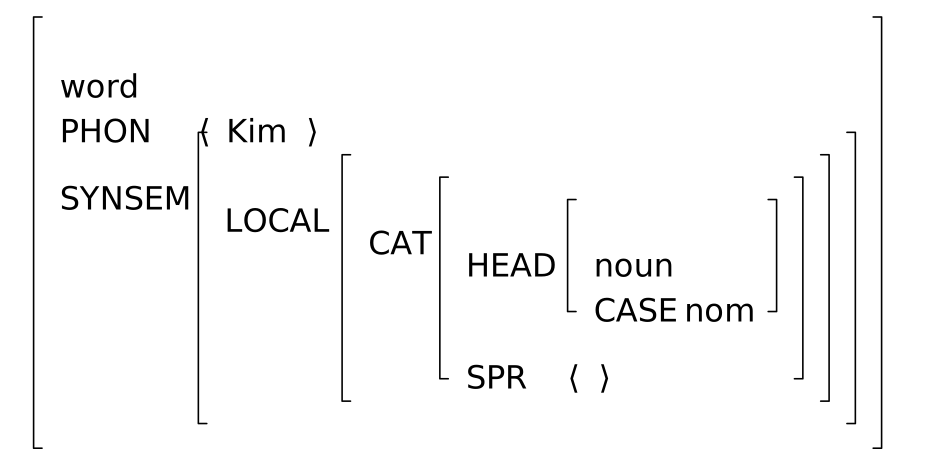
Matrices nest, which is what a feature path such as SYNSEM | LOCAL | CATEGORY | HEAD needs.
Hyphens
A hyphen opens and closes an underline, so a literal one is written \-. Feature names in HPSG and its relatives are full of hyphens — HEAD-DTR, RELIED-ON — and such work rarely underlines. Hyphen (hyphen, CLI --hyphen) swaps the two readings: with literal, a bare hyphen is a hyphen and \-underlined\- underlines instead. Two hyphens are structure rather than markup and are left alone either way: a line of nothing but hyphens is still the horizontal rule, and the one in a path suffix (+-1) still marks that path dashed.
Derivations
A derivation is written differently from a tree. The words come first, at the top; each step draws a rule across everything it combines and writes the result under it; and what the whole thing arrives at stands at the bottom. Categorial grammar is written this way, and so are diagrams of constituent spans.
Turn Derivation on and every node is joined to its daughters by one rule
across all of them, instead of by a line to each. Set Direction to btt as
well and the tree is turned over, so the words come first:
[S\t<
  [NP\t>
    [NP/N the]
    [N dog]
  ]
  [S\\NP\t>
    [(S\\NP)/NP bit]
    [NP John]
  ]
]
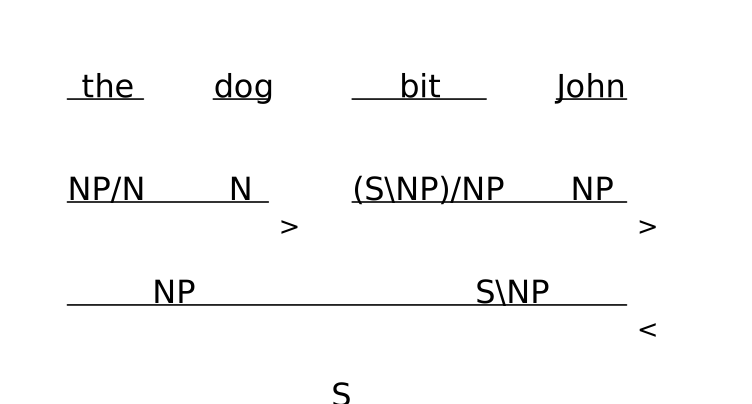
The structure is the ordinary bracket notation. Two things are worth knowing.
The name of each step goes after a column break. [S\t< means the label is
S and the step that produced it is <. The name is set beside the end of its
own rule, small, where a derivation puts it. Anything can go there — >, <,
>B, >T, <Φ> — and none of it needs escaping.
A backslash in a category is written \\. S\\NP draws as S\NP. A single
backslash starts a line break, which is why the doubling is needed.
A category may be a feature structure rather than a plain label, which is how a derivation is written where the categories carry features. The breaks inside the matrix are its own columns; the one that names the rule is the break outside it:
[#(CAT\tS#)\t<
  [#(CAT\tNP#) Kim]
  [#(CAT\tVP#) sleeps]
]
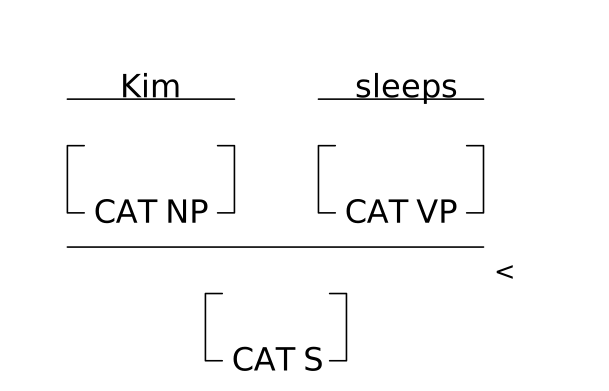
Leave Direction at ttb and the same option draws the spans of a tree from
the top instead, each constituent’s extent marked by a rule:
[S
  [NP
    [D the]
    [N dog]
  ]
  [VP
    [V bit]
    [NP John]
  ]
]
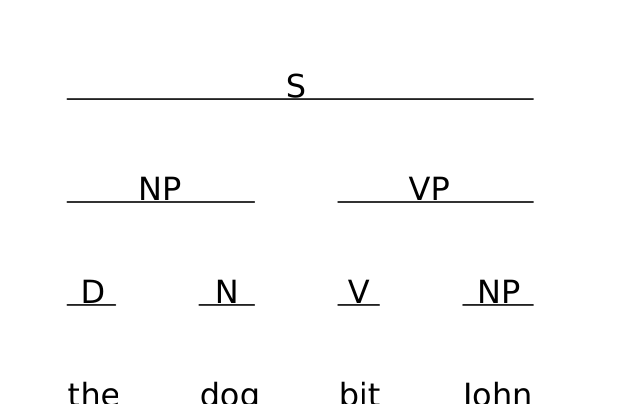
Setting one up. Connector shape: none leaves no bar between a word and its
category. A small V spacing suits a figure set tight down the page; the
gallery’s derivations use 0.5, the smallest there is.
Across the page, Tidy layout: low with a wide H spacing works well. A
derivation is set as a table, each column as wide as the widest thing standing
in it, which is what low does: it pulls the columns together and keeps the
words in order. H spacing then opens every column by the same amount — the
gallery’s derivations use 2.0. Tidy layout: off is the one to avoid: it spaces
the columns by the branching rather than evenly.
What a derivation will not do. Direction: ltr is refused, because a rule
across the premises needs them side by side. Hide default connectors is
refused too: a derivation’s rules are the figure itself, and hiding them
leaves the categories in rows with nothing joining them. TikZ output is
refused as well, since forest draws a tree rather than this figure. Use
PNG, SVG or PDF.
Draw Paths between Nodes
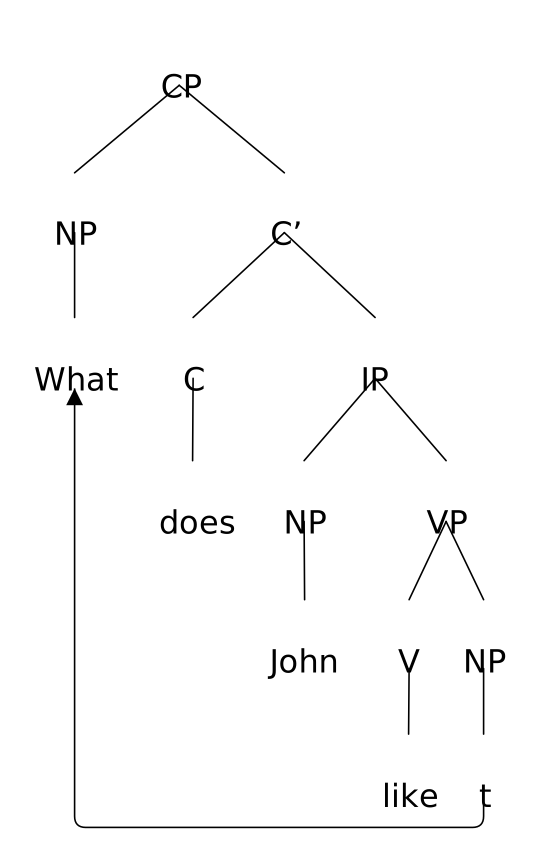
You can draw any number of paths of three different types:
- Non-directional (rendered as dashed line
- - -) - Directional (rendered as solid line
----▶) - Bidirectional (rendered as solid line
◀----▶)
Each path is distinguished by a unique ID number. The ID is specified by putting a plus sign and a number (e.g. +7) at the end of the node text. If a greater-than > or less-than < symbol is placed between the plus sign and the number (e.g. +>7 or +<7), an arrowhead will appear at the end of the path. Note that it makes no difference whether +> or +< is used. The arrow is always directed to the element with one of these ID symbols.
A node can have any number of IDs. The same ID must appear in the text of the two nodes between which the path is rendered. The same ID number cannot appear in more than two places.
[CP
  [NP What+>1]
  [C'
    [C does]
    [IP
      [NP John]
      [VP
        [V like]
        [NP t+1]
      ]
    ]
  ]
]
Draw Extra Connectors between Nodes
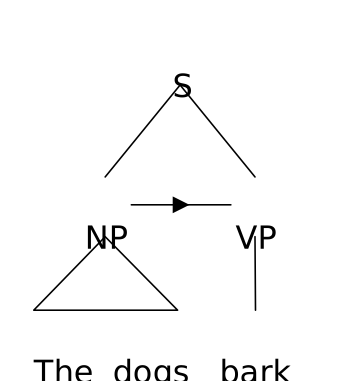
You can also add extra connector between nodes in the same fasion as you draw paths between nodes. Extra connectors are drawn as straigt lines (not as polylines). You may enable the Hide connectors option when drawing extra connectors.
- Non-directional (rendered as solid line
-----) - Directional (rendered as solid line
--▶--) - Bidirectional (rendered as solid line
-◀-▶-)
Each additional connectors is distinguished by an ID number. The ID is specified by putting a a number after a sequence of a plus and a minus symbols (e.g. +-8) at the end of the node text. If a greater-than > or less-than < symbol is placed between the minus sign and the number (e.g. +->8), an arrowhead will appear at the end of the connector. Note that it makes no difference whether +-> or +-< is used. The arrow is always directed to the element with one of these ID symbols.
A node can have any number of IDs. The same ID must appear in the text of the two nodes between which the additional connector is rendered. The same ID number cannot appear in more than two places.
[S
  [NP+-1 The dogs]
  [VP+->1 bark]
]
Penn Treebank Format
RSyntaxTree automatically detects and converts Penn Treebank format to bracket notation:
# Penn Treebank format
(S (NP the dog) (VP runs))

# Equivalent bracket notation
[S [NP the dog] [VP runs]]
Escaping special characters in Penn Treebank format:
| Input | Displayed as |
|---|---|
\( \) |
Parentheses () as literal text |
\[ \] |
Square brackets [] as literal text |
Example:
(S (NP hello\(world\)) (VP test))
→ [S [NP hello(world)] [VP test]]
Running RSyntaxTree Yourself (advanced)
The following are not offered by the web app. They are available when you run RSyntaxTree on your own machine, as the gem or as the Docker image.
Using a Font of Your Own
The scripts the gallery covers are named explicitly rather than left to the system’s generic fallback: Noto Sans Arabic / Noto Naskh Arabic, Noto Sans Hebrew / Noto Serif Hebrew, and the Devanagari, Thai and Khmer faces of Noto Sans and Noto Serif. Where those fonts are installed, the same input renders the same way from one machine to the next. Mathematical alphanumerics (U+1D400–, such as the italic v of vP) are not named yet and still depend on what the system offers.
The family chains above take precedence over whatever your system would pick by itself, which also means an Arabic or Devanagari font you prefer will lose to Noto. You can override any entry with a fontconfig alias — no change to RSyntaxTree is needed. For example, to render Arabic with Amiri, put this in ~/.config/fontconfig/fonts.conf and run fc-cache -f:
<?xml version="1.0"?>
<!DOCTYPE fontconfig SYSTEM "urn:fontconfig:fonts.dtd">
<fontconfig>
  <alias binding="strong">
    <family>Noto Sans Arabic</family>
    <prefer><family>Amiri</family></prefer>
  </alias>
</fontconfig>
Measurement and drawing both go through fontconfig, so the substituted font is the one measured. The layout stays correct.
On macOS. All of the above holds where Pango resolves fonts through fontconfig, which means Linux and the Docker image. On macOS, Pango goes through CoreText and does not consult fontconfig, so an alias has no effect; name the font you want in the input’s font style instead. CoreText also answers every emoji codepoint with Apple Color Emoji, whose colour glyphs librsvg does not draw, so a tree containing emoji is best generated on Linux or in the Docker image.
Checking Input Without Drawing
--validate reports whether the input would draw. Nothing is drawn and no
file is written: the diagnosis goes to standard output as JSON, and the exit
code is 0 when the input is accepted and 1 when it is not.
rsyntaxtree --validate "[S [NP the cat] [VP sat]]"
Options are taken into account, so an input that depends on one is judged with it:
rsyntaxtree --validate --hyphen literal "[X V-bar]"
The same input without the option is rejected, with the diagnosis naming what is wrong and where:
$ rsyntaxtree --validate "[X V-bar]"
{
  "schema": "rsyntaxtree.error/1",
  "ok": false,
  "errors": [
    {
      "code": "bare_hyphen",
      "message": "Error: input text contains an invalid string\n > V-bar",
      "label": "V-bar",
      "position": 1,
      "hint": "A hyphen opens an underline. Escape it (e.g. f\\-structure, V\\-bar) or set the hyphen option to literal.",
      "retryable": true
    }
  ]
}
Every error of a kind is reported together, not just the first one found:
an input with three bad labels lists all three, one entry each, so one
round of fixes covers them. The stages are ordered — an empty
input is refused before anything else, then options, then the bracket
structure, then the labels, then whole-tree checks such as a movement
path with one end — and a mistake stops the later stages, with a
note saying that fixing what is listed may reveal more. A missing bracket
shifts every token after it, so reporting past it would blame labels that are
only artifacts of the real mistake.
The code is the part meant for a program. Every code the library can
report is listed in RSTError::CODES, and the list only grows: a code once
published is not renamed or removed, so a program keyed by code — one that
translates the diagnosis, or tallies what kinds of mistake a writer makes —
only ever has entries to add. The whole set matters to the second kind: a
code nobody triggered is not a code that cannot occur.
The rest of an answer is not a contract: the wording of a message or a hint
may change between releases, a field may be absent where it does not apply
(there is no label on a mistake that belongs to no single label), and the
exit code is the stable part of the answer.
Notation Reference
--notation prints the one-page reference — the characters that already mean
something, then every feature at a line each, then the options. --examples
prints every published example with the options it was drawn with. Both write
and exit without reading any input.
rsyntaxtree --notation
rsyntaxtree --examples
The same material is on the site as plain text, for a reader that can fetch a URL but cannot run a command: llms.txt is an index, notation.txt is the one-page reference by itself, and llms-full.txt holds the reference, this manual and every example in one file. All are generated from the sources they describe.
Standard Input Support
You can pipe tree data via standard input:
echo "[S [NP hello] [VP world]]" | rsyntaxtree -f svg -o ./
cat tree.txt | rsyntaxtree -f png -o ./
Configuration File
Create a .rsyntaxtreerc file in your home directory or current directory to set default options:
# ~/.rsyntaxtreerc
format: svg
color: modern
fontsize: 18
leafstyle: auto
symmetrize: off
CLI arguments override configuration file settings. Unknown options in the config file will generate warnings, and invalid values will cause errors with helpful messages.
Escaping Text from a Program
A program that writes notation from strings it did not choose — a tagger’s
tokens, a corpus’s words — has to escape whatever those strings contain, and
copying the escaping rules into that program means they drift from the
notation as it changes, silently, as a different figure. RSyntaxTree.escape
does the escaping in the library that knows the notation:
require "rsyntaxtree"

RSyntaxTree.escape("C++ 2+2")                     # => "C\\+\\+<>2\\+2"
RSyntaxTree.escape("well-known dog", as: :phrase)  # => "well\\-known dog"
RSyntaxTree.escape("Tom's", apostrophe: :keep)     # => "Tom\\'s"
RSyntaxTree.escape("a\tb\nc", as: :cell)           # => "a\\tb\\nc"
as: says where the text will stand, which decides what its whitespace
means: a :word is one leaf or one label, and a space inside it becomes
<>; a :phrase is a leaf of several words, whose spaces stay so the leaf
gets a triangle; a :label is a node label, like a word but with a newline
kept as a line break; a :cell is one cell of a column-aligned or matrix
label, where a tab becomes the column break and a newline the row break.
hyphen: must match the option the figure is drawn with. Under :markup
(the default) a hyphen is escaped; under :literal a bare hyphen is already
itself and the escaped form means an underline, so no one spelling serves
both. apostrophe: is :curly (the default, a straight apostrophe set as a
curly one) or :keep.
The result is checked the only way it can be: the test suite draws what
escape returns for every markup character, alone and in company, and reads
the text back off the figure. One text has no spelling under hyphen:
literal — a line of nothing but three or more hyphens, which is the
horizontal rule — and asking for it raises ArgumentError rather than
returning notation that draws an empty leaf. Empty and all-whitespace text
comes back as the whitespace it holds, which draws as a blank; a program
building a tree from tokens will usually want to drop such tokens first.
TikZ Output
RSyntaxTree can generate TikZ/forest code for LaTeX documents using the -f tikz option. The output can be used directly in LaTeX with the forest package.
Limitations: The TikZ output focuses on tree structure and does not support the following visual features:
- Per-node coloring (
@color:) - Enclosures (
#,##) - Triangle connectors (
^) - Text decoration (bold, italic)
- Subscript/superscript (
_x_,__x__) - Path drawing (
+1,+>1) - Column alignment (
\t) - Nested matrix (
#(…#)) - Grey line scheme (
color: gray)
None of these is refused; each is dropped, and the tree is written out
without it. A label that is a matrix arrives as its cells run together on one
line, so check the forest code against the figure before publishing it.